


Why PixVisualize
Show the difference, sell the transformation. PixVisualize adds a Before / After image comparison slider to WordPress that visitors drag themselves: photo retouching, renovation, beauty, real estate, e-commerce — when customers see the result, they click.
The free version already covers the essentials: horizontal slider, customizable labels, formats, slider position, full-width display and basic Gutenberg / Elementor blocks. The Pro version goes further with advanced options: shortcode generator, per-device ratio, customizable handle and separator, styled container, interactions (hover, auto-scan, magnifier) and WooCommerce product page integration.
Comparison example
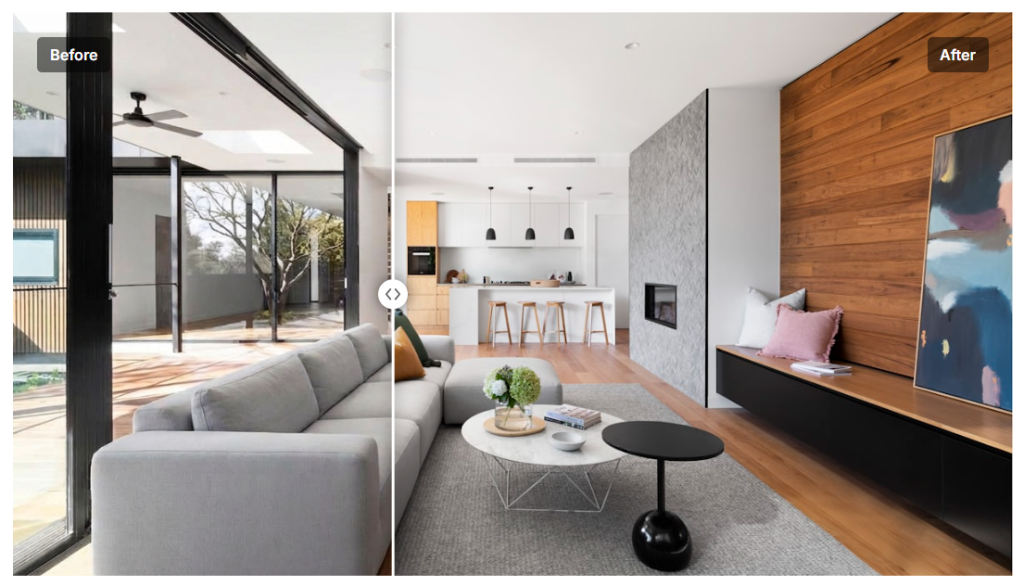
What your visitors will love
Instant proof
A Before / After slider visitors drag themselves: the most convincing demonstration there is.
Beautiful on every screen PRO
Positions and formats adjustable separately on tablet and mobile, touch swipe included.
Interactions that retain PRO
Hover, auto-scan, magnifying loupe: visitors stay, explore, buy.
Publish your first comparison slider for free with PixVisualize essential features.
Installation & settings
Install in 3 steps
- Copy the pixvisualize folder into /wp-content/plugins/ (or upload the .zip via Plugins → Add New → Upload).
- Go to Plugins → Installed Plugins, find PixVisualize, click Activate.
- Optional prerequisites: Elementor (widget only) and WooCommerce (product gallery only). The block and shortcodes work standalone.
The PixVisualize page in the admin
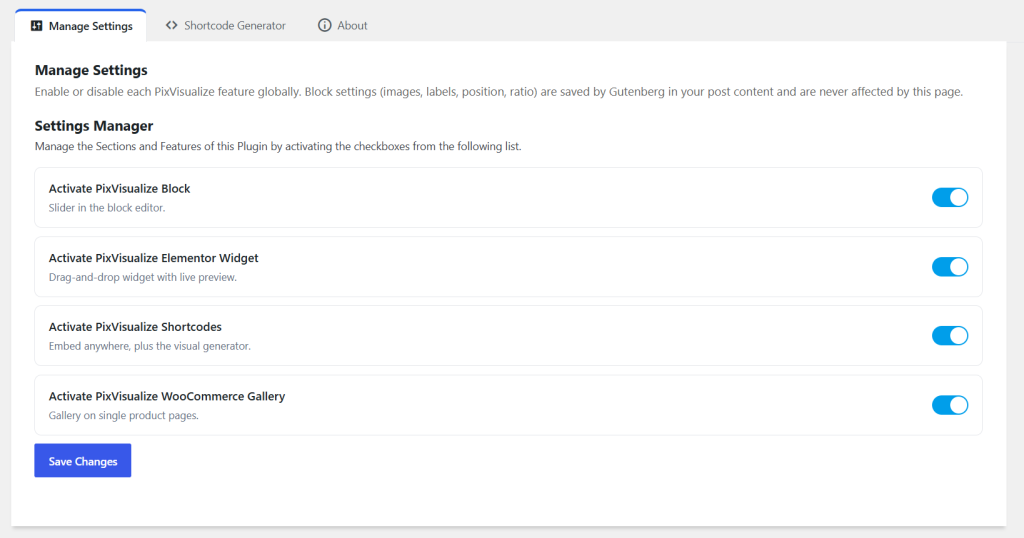
After activation, the PixVisualize menu appears with options enabled by default:
* In the Free version: the PixVisualize block (Gutenberg) and the PixVisualize Elementor widget.
* In the Pro version: both previous options, plus PixVisualize shortcodes and the PixVisualize WooCommerce gallery.
With the Pro version, the Shortcode Generator tab lets you create your shortcodes without writing code, then copy them with Copy Shortcode. The About tab presents the features available in the Pro version.
This page only controls global activation. Each comparison’s settings live in your content: disabling then re-enabling a toggle brings your sliders back as they were.
Gutenberg block
The PixVisualize block integrates with the native WordPress editor: no shortcode, no external settings. You insert the block, pick two images, adjust the layout — the editor preview uses the same engine as the published page.
The free version covers the essentials — images, labels, caption, format, height, position. The Pro version adds vertical orientation, advanced appearance (handle, separator, labels), tablet / mobile responsive and interactions.
Publish a comparison in 5 steps
Insert the block
In the editor, click "+", search "PixVisualize" and insert the block exactly where the future comparison will be.
Choose the images
In the sidebar, Images & Content section, click Select for the Before then the After image: the preview updates instantly, preferably with two same-size images.
Adjust the layout
Layout & Orientation section: format (always honored in contain — 21/9 fills the width, 9/21 fills the height), height, initial slider position, full width if needed.
Customize the appearance
Appearance section: handle style, separator colors, label typography; Interactions section: hover, auto-scan, magnifier (Pro features).
Publish
Click Update or Publish: public rendering uses exactly the same engine as the editor preview.
1. Everything is adjusted in the sidebar, no code
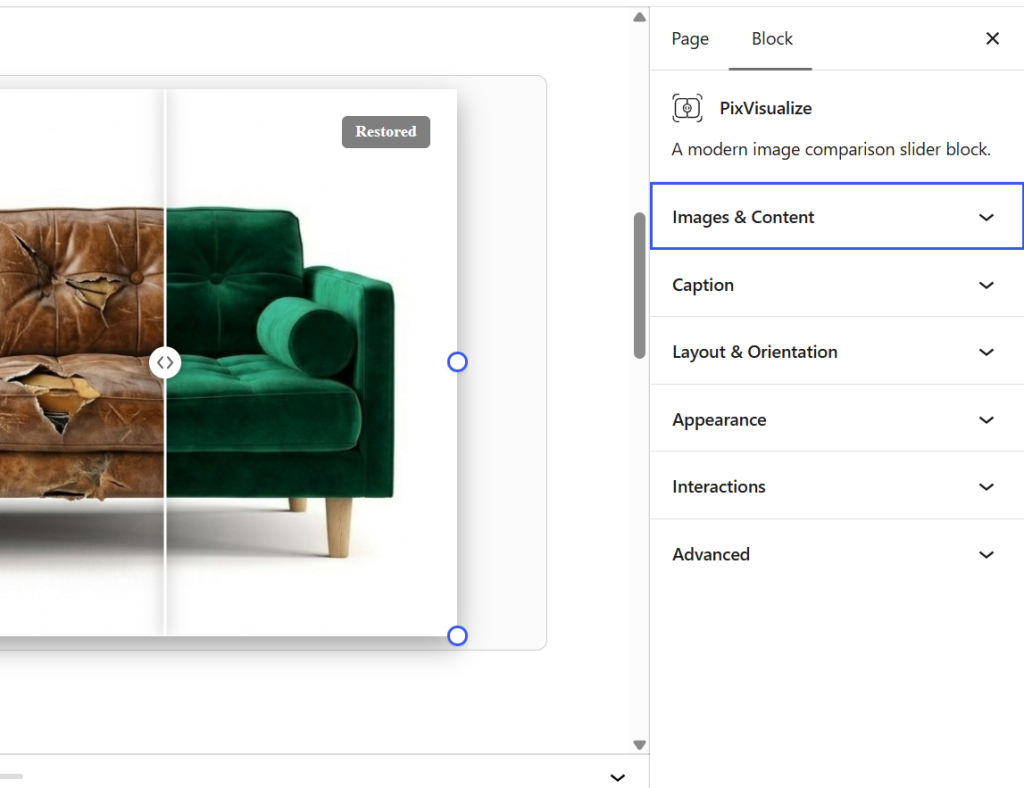
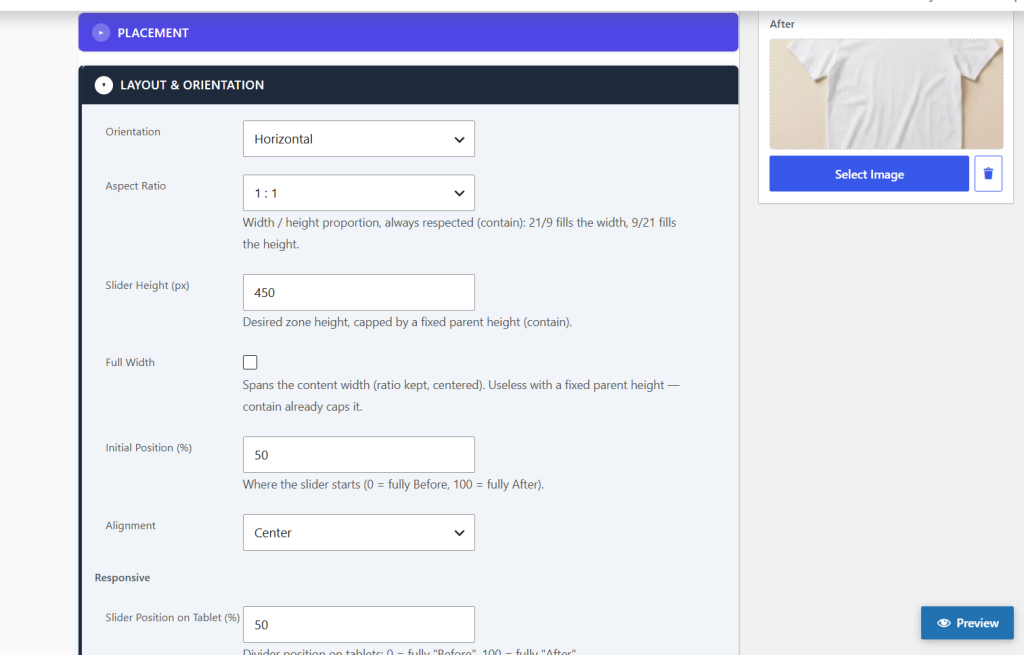
Each panel has a precise role: Images & Content (images, labels, display), Caption (title + text under the slider, with card effect on border and shadow), Layout & Orientation (format, height, position, full width), Appearance and Interactions (Pro features).
Settings are responsive: set a distinct position and format for tablet and mobile (mobile wins over tablet, which wins over desktop; empty = desktop setting applies) — perfect for touch.
2. Faithful preview and proportional resizing
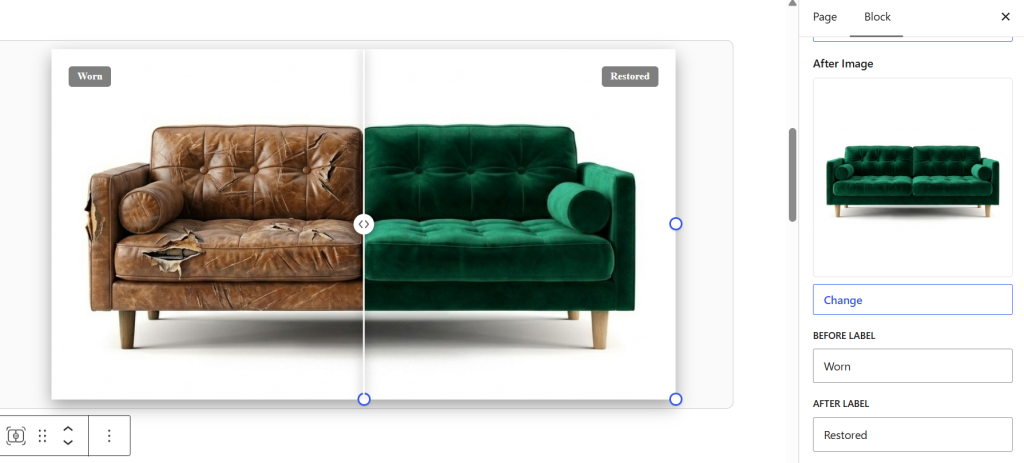
What you see in the editor is what your visitors will see: the slider is manipulable in the preview (mouse, touch, keyboard). Resize handles (bottom, right, corner) automatically keep proportions: width follows height and vice versa, to preserve the chosen format.
In the free version, a “PixVisualize Pro” panel recalls advanced features; in the Pro version, all controls are unlocked and the preview is complete (hover, scan, magnifier).
Your settings are never overwritten
Each block’s settings are stored in the post content. The PixVisualize → Manage Settings page only drives global feature activation (block, widget, shortcodes, WooCommerce): disabling then re-enabling a switch brings your content back as it was.
Shortcodes PRO
Fastest without an editor: PixVisualize → Shortcode Generator. Select the Before then After images, fill in the configuration, click Copy Shortcode, then paste the shortcode into your post or page. This method is especially handy with other page builders, notably Divi, Bricks, Beaver Builder, WPBakery and Oxygen, complementing the already available Gutenberg and Elementor integrations.
Clear Images empties the selected images, while Reset restores default values. Only attributes different from defaults are copied into the shortcode.
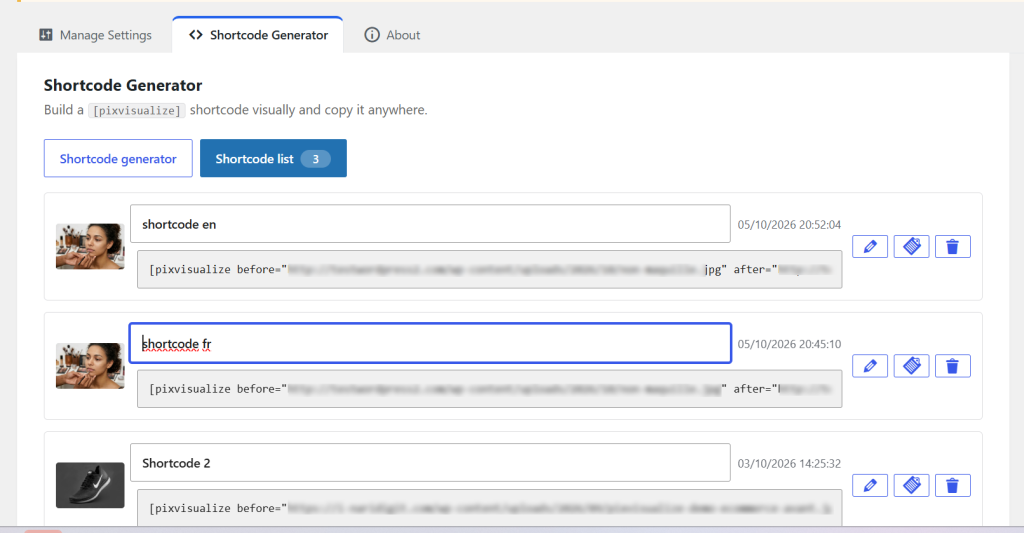
The Shortcode list sub-tab lets you find your saved shortcodes with thumbnail, customizable name and date, plus edit, copy and delete buttons.
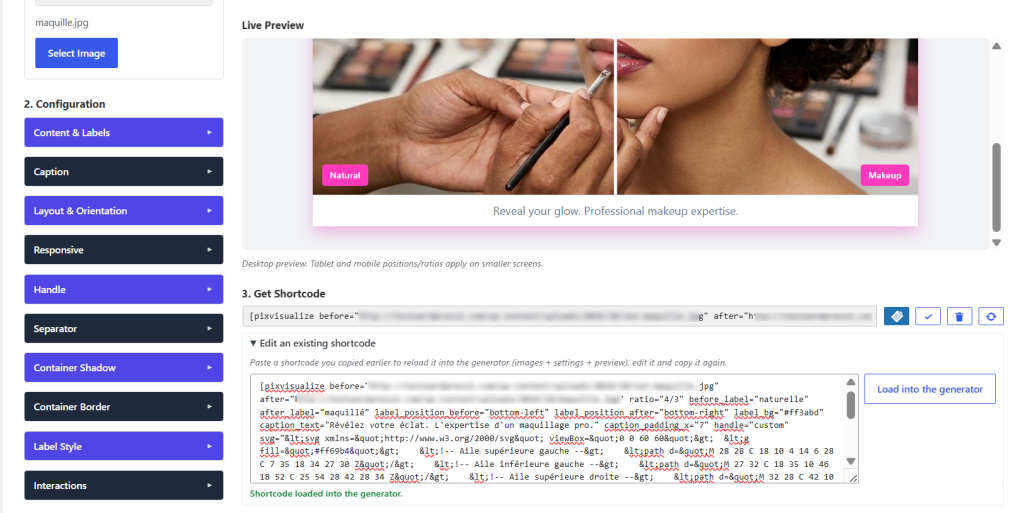
The Edit an existing shortcode block lets you paste an existing shortcode, then click Load into the generator to load and edit it visually.
The visual generator, without writing code
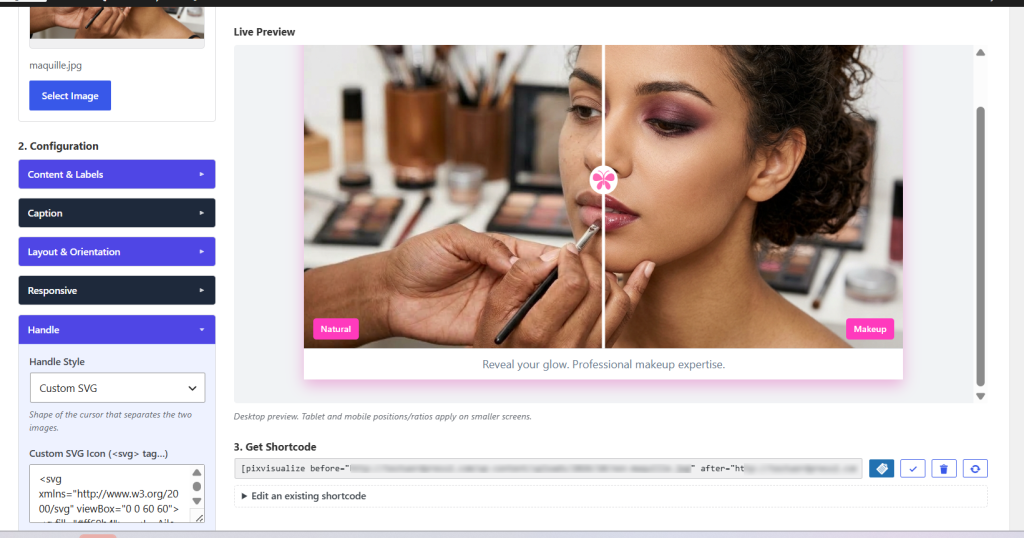
PixVisualize → Shortcode Generator page (active Pro license + Shortcodes switch checked), Shortcode generator sub-tab: click Select Image for the Before then After image, fill in the configuration (format, orientation, position, height, labels), then Copy Shortcode to paste it into any content — without Elementor. The Save icon keeps it in the list, Clear Images empties images and Reset returns to defaults.
The generator only copies attributes different from defaults: the shortcode stays short and readable.
Minimal PRO
[pixvisualize before="BEFORE-IMAGE-URL" after="AFTER-IMAGE-URL"]Avec options PRO
[pixvisualize before="..." after="..." position="50" ratio="16/9" orientation="horizontal" height="450" before_label="Before" after_label="After" handle="circle" hover="1" autoscan="1" magnifier="1"]Attributes are generated automatically by the Shortcode Generator from the selected options. So you don’t need to type them manually.
Complete attribute reference
| Attribute | Default | Description |
|---|---|---|
| before | (empty) | Before image URL (required) |
| after | (empty) | After image URL (required) |
| before_label | Before | Before label text |
| after_label | After | After label text |
| show_labels | 1 | 0 = hide labels |
| orientation | horizontal | horizontal (left/right) or vertical (up/down) |
| ratio | 16/9 | Area shape: 1/1, 4/3, 3/2, 16/9, 21/9, 2/1… |
| height | 450 | Height in px |
| full_width | 0 | 1 = full width |
| position | 50 | Slider initial position (0–100) |
| alignment | center | left, center, right |
| tablet_position | 50 | Position on tablet (768px–1024px) |
| mobile_position | 50 | Position on mobile (under 768px) |
| tablet_ratio | empty | Tablet format (empty = inherits desktop) |
| mobile_ratio | empty | Mobile format (empty = inherits desktop) |
| handle | circle | circle, transparent, line, arrows, custom |
| svg | empty | SVG code for the custom handle |
| handle_size | 24 | Handle circle diameter in px, independent control (16–64) |
| handle_arrow_color | #666666 | Color of arrows inside the handle, independent control |
| separator_thickness | 2 | Vertical bar thickness in px, independent control (1–10) |
| separator_color | #ffffff | Single synced control: background of the vertical bar AND the handle circle |
| separator_shadow | 1 | 0 = no shadow; grouped shadow over slider + handle (no shadow at the junction) |
| label_position_before | top-left | top-left, top-right, bottom-left, bottom-right |
| label_position_after | top-right | After label corner (same values) |
| label_bg | #00000080 | Label background (alpha supported) |
| label_color | #ffffff | Text color |
| label_font_size | 12 | Font size in px (10–24) |
| label_font_weight | 600 | Font weight (400–900) |
| label_padding_x | 10 | Horizontal inner margin in px (0–30) |
| label_padding_y | 5 | Vertical inner margin in px (0–30) |
| label_border_radius | 4 | Corner radius in px (0–20) |
| container_shadow | 0 | 1 = enables container drop shadow |
| container_shadow_color | #000000 | Shadow color |
| container_shadow_horizontal | 0 | Horizontal offset in px |
| container_shadow_vertical | 8 | Vertical offset in px |
| container_shadow_blur | 20 | Blur radius in px |
| container_shadow_spread | 0 | Spread radius in px |
| container_shadow_opacity | 35 | Opacity from 0 to 100 |
| container_border_width | 0 | Border thickness in px (0 = none) |
| container_border_color | #000000 | Border color |
| container_border_style | solid | solid, dashed, dotted, double |
| container_border_radius_tl | 0 | Top-left corner radius in px |
| container_border_radius_tr | 0 | Top-right corner radius in px |
| container_border_radius_br | 0 | Bottom-right corner radius in px |
| container_border_radius_bl | 0 | Bottom-left corner radius in px |
| hover | 0 | 1 = slider follows mouse without click |
| autoscan | 0 | 1 = auto-scan on load |
| autoscan_duration | 2500 | Scan duration in ms (1000–10000) |
| magnifier | 0 | 1 = zoomed magnifier around slider |
| magnifier_zoom | 2 | Zoom factor (1.5–4) |
The shortcode works independently of Gutenberg and Elementor: the Shortcodes toggle just needs to be on. Pro feature: shortcodes are only available with an active Pro license.
Manage your saved shortcodes PRO
- "Shortcode list" sub-tab: find each shortcode (thumbnail, name, date). Click the name to rename it and stay organized. PRO
- Edit icon: reloads the generator (images + settings + preview) to edit without redoing everything, then copy the new version. PRO
- Copy / trash icons: copy or delete (with confirmation). An identical code is never duplicated in the list. PRO
- "Edit an existing shortcode" block: paste a shortcode copied from a page then "Load into the generator" to visually re-edit it. PRO
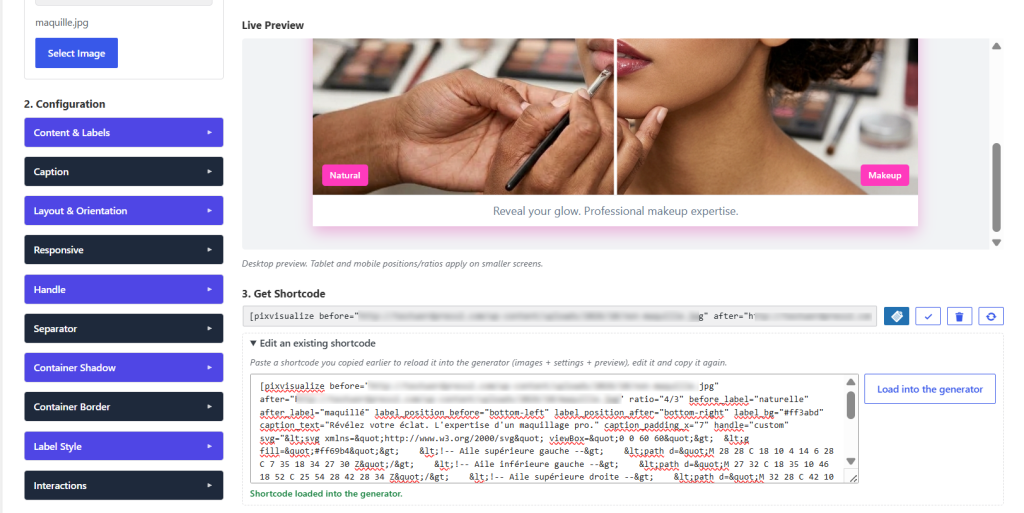
Find, edit and re-import your shortcodes
“Shortcode list” sub-tab: all your shortcodes kept in the browser, with thumbnail and inline-renamable name, date, and Edit (reloads the generator for editing), Copy and Delete buttons.
The collapsed Edit an existing shortcode block re-imports a shortcode already pasted somewhere: paste it, click Load into the generator and edit it visually instead of rebuilding everything.
Elementor widget
The PixVisualize widget brings the Before / After comparison slider to Elementor, with exactly the same engine as the Gutenberg block. What you adjust in the panel, the preview shows live (WYSIWYG), and the published result is pixel-identical.
The free version covers the essentials — images, labels, format, height, initial position. The Pro version unlocks the full Style tab (handle, labels, container), vertical orientation, tablet / mobile settings and interactions (hover, auto-scan, magnifier).
Insert the widget in 3 steps
Drag the widget into the page
Open the page with Elementor, search "PixVisualize" in the widget panel (General category) and drag it into a column or container, exactly where the future comparison will be.
Choose images and adjust layout
Select the Before and After images, adjust format, height and initial slider position: the right-side preview updates in real time, no reload.
Style, test, publish
Refine handle, labels and container in the Style tab, test each interaction right in the preview, then click Publish.
1. Choose images and labels
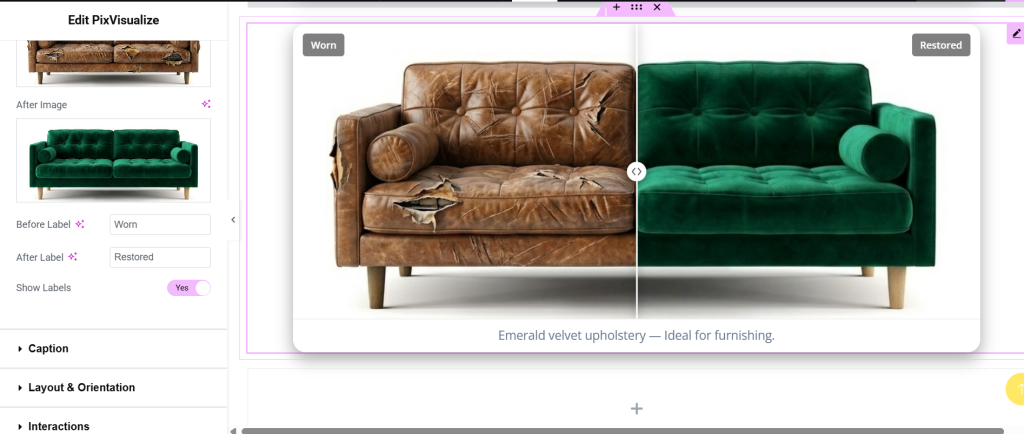
In the Content tab, Images & Content section, click each frame to open the media library: pick a Before then an After image, preferably the same dimensions (same framing = credible comparison, JPG photos, PNG graphics).
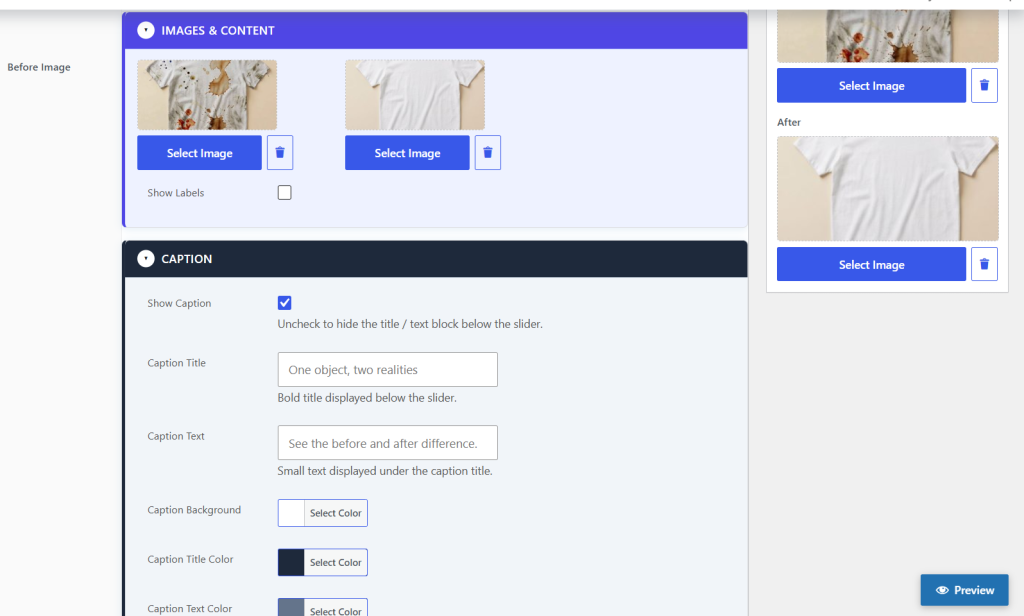
Customize the labels (“Before” / “After” by default) or hide them with Show Labels. The Caption section adds a title and text under the slider — the container then adopts a “card” effect (border and shadow around the whole).
2. Adjust format: ratio is always honored
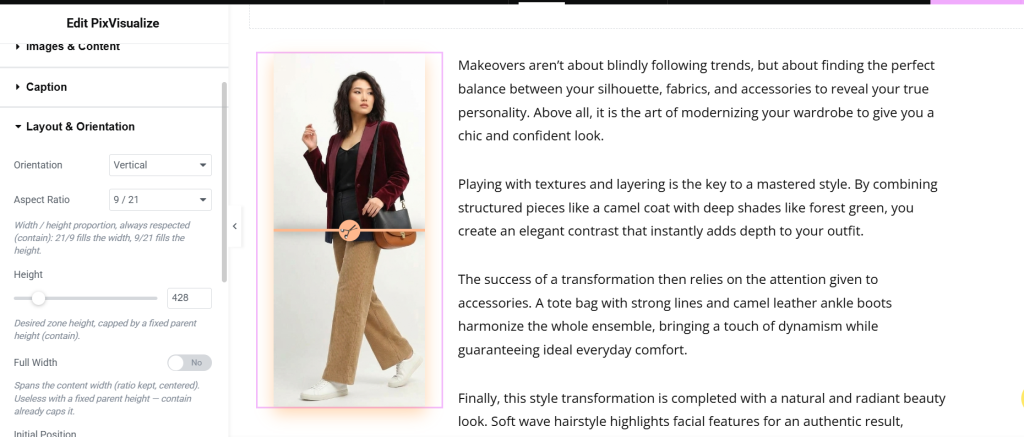
Section Layout & orientation: the image format is a promise kept in contain — the slider always fits its parent, no distortion, no cropping. Concretely: a 21/9 format fills the available width, a 9/21 fills the desired height, and the editor preview shows exactly the published rendering.
Height (100 to 2000 px) is the desired height: it is capped by the parent’s height when the parent is fixed. Full width stretches the slider across the content width — useful with an auto-height parent, useless with a fixed parent (contain already caps). Initial position (0 to 100%) sets the slider’s starting point (50% = centered).
Layout & orientation, setting by setting PRO
| Setting | What it does | Remember |
|---|---|---|
| Orientation | Slider direction: horizontal (left / right) or vertical (up / down). | Vertical mode is a Pro feature. |
| Image format | Width / height proportion, always honored in contain. | 21/9 = wide, 9/21 = tall, 1/1 = square. |
| Height | Desired area height, 100 to 2000 px. | Capped by a fixed-height parent. |
| Full width | The slider takes 100% of content width. | No useful effect with a fixed parent. |
| Initial position | Slider start position, 0 to 100%. | 50% = perfectly centered slider. |
3. Style it
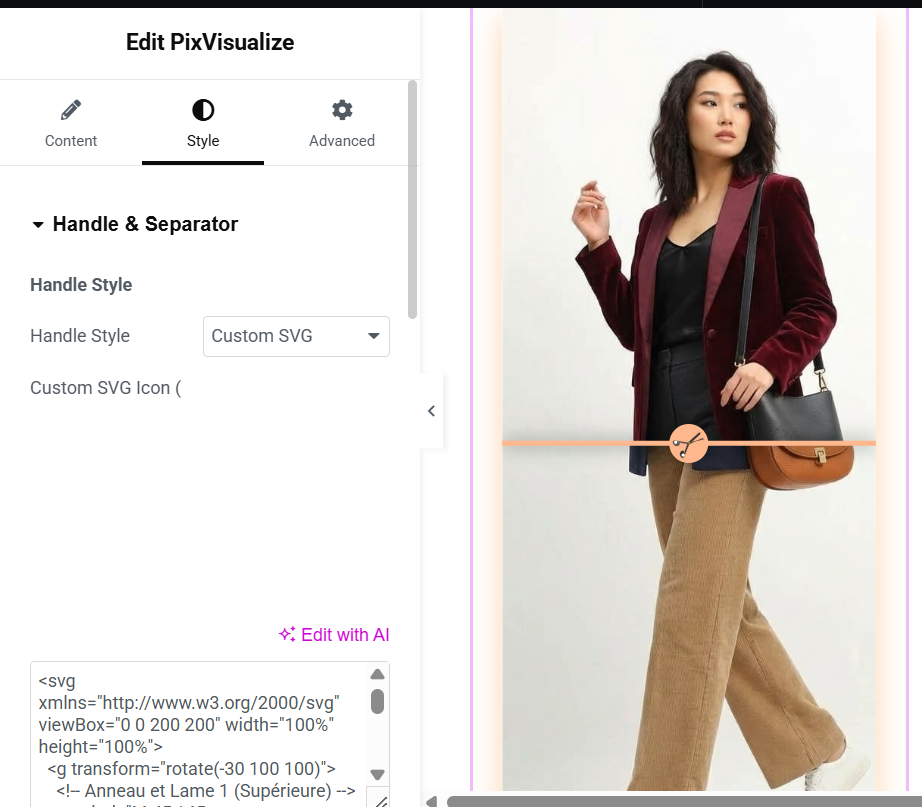
In the Style tab, the “Container” section styles the slider card: drop shadow, border and rounded corners.
The Handle & separator, Labels and Caption (Pro version) sections customize the slider (circle, line, arrows or SVG), the Before / After labels (position, typography, colors) and the caption block, with instant preview.
4. Test interactions in the live preview PRO
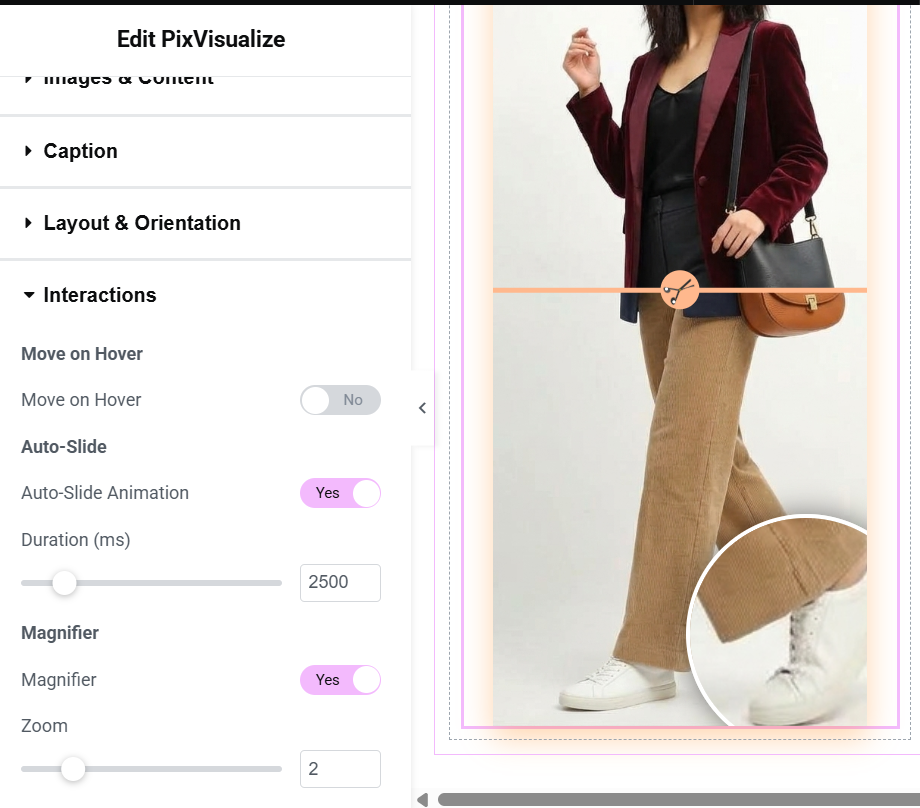
The Interactions (Pro) section can be tested without publishing: hover movement makes the slider follow the mouse, auto-scan animates the slider on load (duration adjustable in milliseconds) and the magnifier zooms details around the slider (x1.5 to x4).
In Layout & orientation, dedicated tablet and mobile positions and formats take over automatically: mobile wins over tablet, which wins over desktop — leave empty to inherit the desktop setting.
WooCommerce PRO
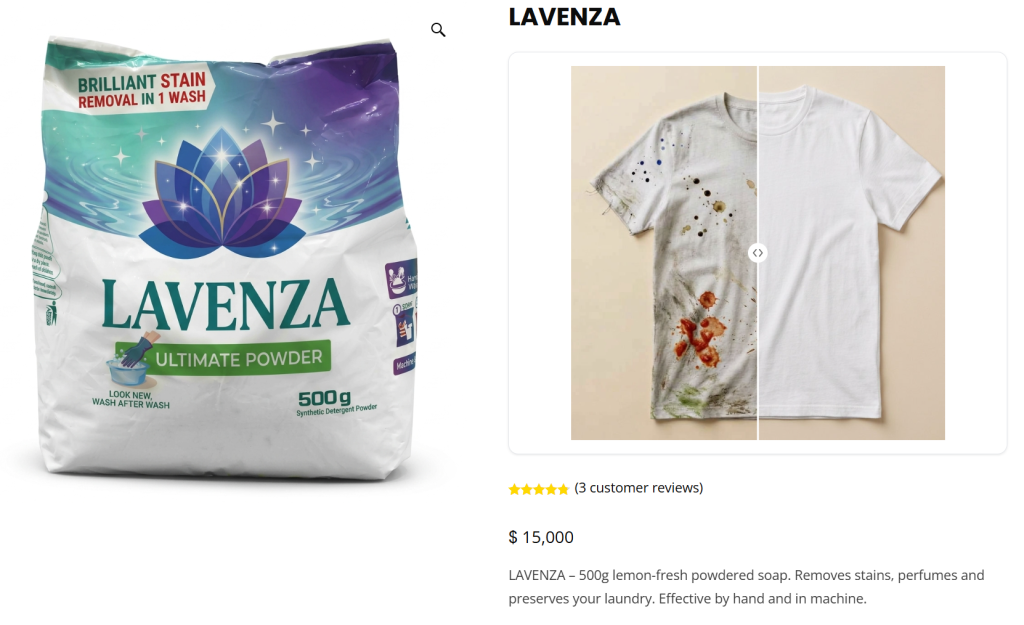
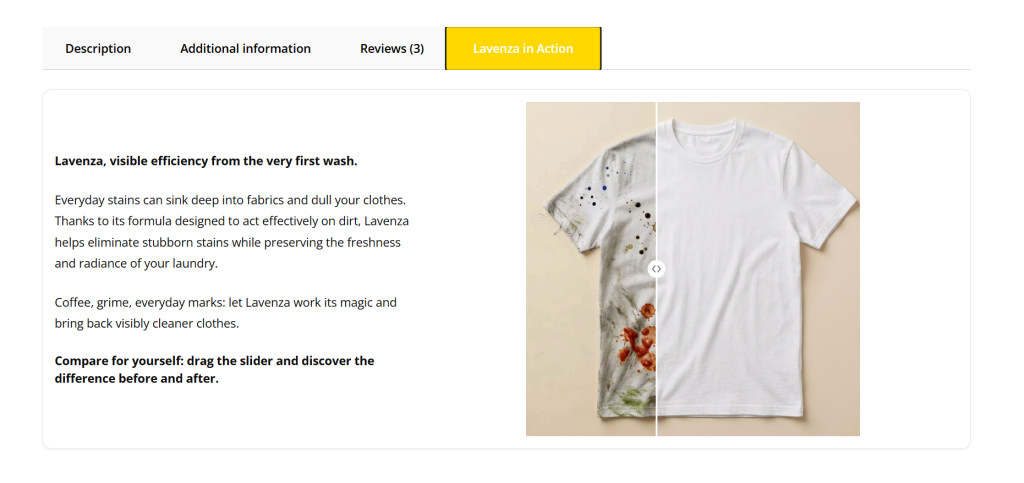
Prove quality on the product page. The Pro Before / After gallery integrates with WooCommerce using the same engine as the block: edit a product and the PixVisualize metabox appears (quick preview + image selection), extended by a full PixVisualize tab in the Product Data panel.
Requires active WooCommerce and the Enable PixVisualize WooCommerce Gallery switch checked (PixVisualize page). Without either: no metabox, no tab, no display — even with residual settings, which reappear intact on reactivation.
1. Choose images, content and card preview
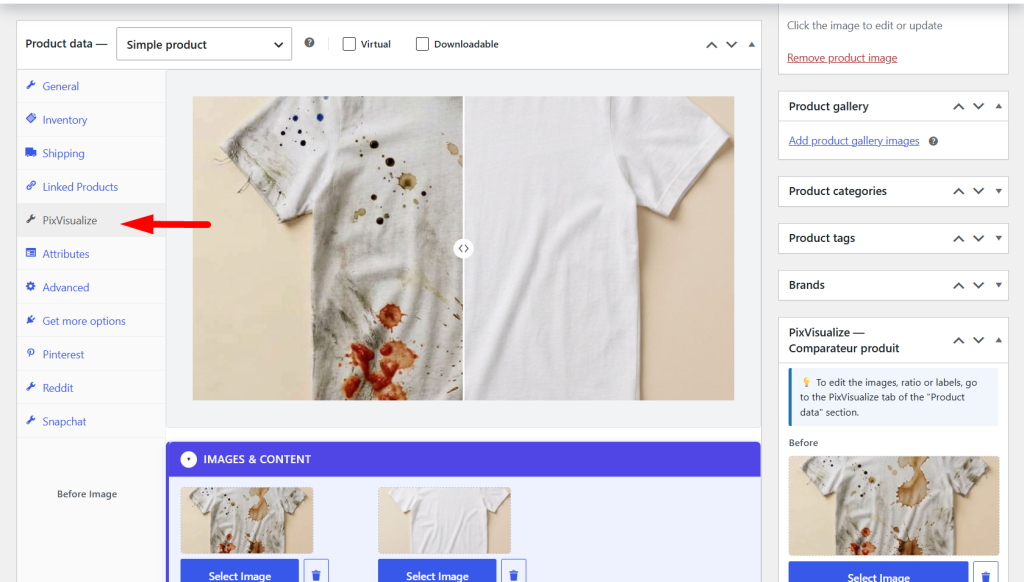
Start by selecting the Before and After images, then configure the labels and their corner positions. The live preview, shown at the top of the panel, instantly reflects every change.
The Caption section adds a title and text under the slider. When the caption is used, border and shadow apply to the whole card: they frame the slider on top and sides, then the caption at the bottom, with no double border at the junction.
Set up on a product page
Open the product
Edit a WooCommerce product page: the PixVisualize metabox and Product Data tab are visible if the WooCommerce Gallery toggle is on.
Choose images and content
Select the Before / After images, fill in labels, their positions, then caption title and text: the live preview updates.
Choose the placement
Placement section: several positions on the page (gallery, buy column, tabs, page bottom or dedicated tab), plus a description above, below or in two columns.
Adjust, animate, save
Layout and orientation, responsive, appearance, interactions: the same settings as the block, designed to convert. Click Update.
2. Place the comparison in the right spot
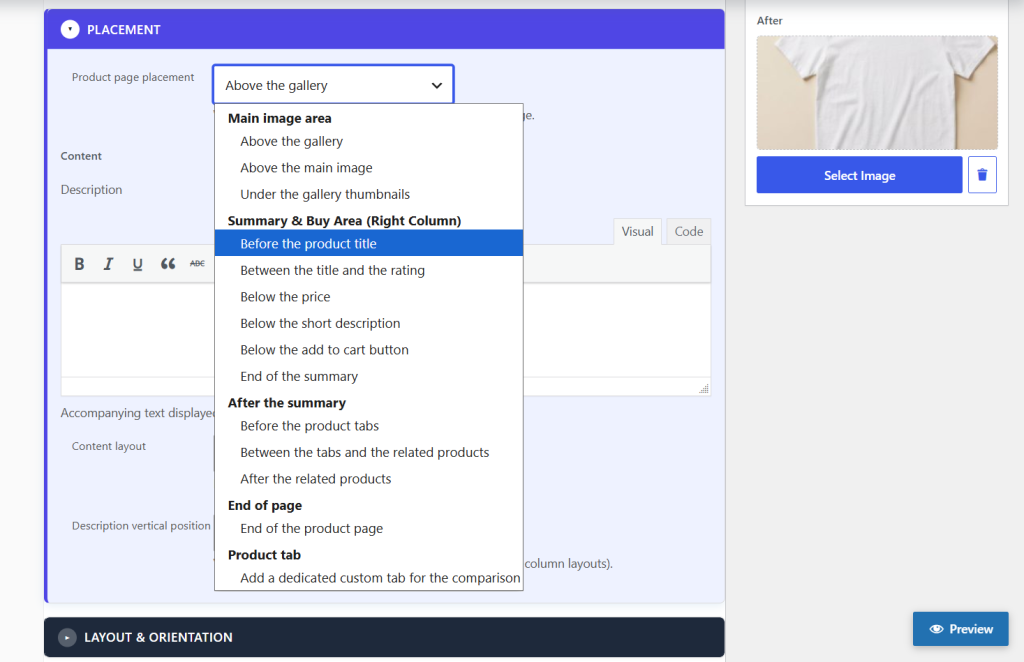
Main image area: above the gallery, above the main image, under thumbnails. Summary & buy column: before title, under price, under excerpt, under add-to-cart button. After summary: before or after product tabs, after related products. Page bottom and dedicated product tab (title customizable via Tab Title).
Add a description if needed, shown above, below or in two columns left / right of the slider.
Store intact without WooCommerce
If WooCommerce is missing or disabled, or the switch is unchecked, nothing displays and nothing breaks: no metabox, no tab, no output on pages. Existing settings are kept and reappear on reactivation.
Free vs Pro
Full transparency: all features, grouped by theme for at-a-glance reading. ✓ = included, ✗ = not available. The free version is complete and time-unlimited; the Pro license unlocks the rest, never touching your existing content.
Full comparison
| Feature | Free | Pro |
|---|---|---|
| Before and After images — both compared images, picked from the media library. | ✓ | ✓ |
| Before / After labels — customizable texts and global display. | ✓ | ✓ |
| Caption (title and text) — title and text under the slider, with card effect on border and shadow. | ✓ | ✓ |
| Horizontal comparison — horizontal orientation, always-honored format (contain), height, initial position, full width, alignment. | ✓ | ✓ |
| Horizontal and vertical comparison — up / down slider instead of left / right. | — | ✓ |
| Tablet and mobile responsive — dedicated positions and formats per screen, with desktop inheritance. | — | ✓ |
| Custom handle + SVG — circle, line, arrows or custom SVG icon, adjustable size and margins. | — | ✓ |
| Separator: thickness, color and shadow — thickness, handle-synced color, seamless grouped drop shadow. | — | ✓ |
| Advanced labels: position, typography and color — 4-corner position, background, text color, font size and weight, inner margins, rounded corners. | — | ✓ |
| Fully customizable caption (title and text) — background, title and text colors, alignment, sizes, inner margins. | — | ✓ |
| Container: default shadow, border and rounded corners — shadow, border and rounded corners with default values. | ✓ | ✓ |
| Fully customizable container — shadow color and fine-tuning, border width, style and color, per-corner radii. | — | ✓ |
| Interactions — mouse-hover slider, auto-scan on load, magnifier with adjustable zoom. | — | ✓ |
| Essential Gutenberg block — free settings, manipulable preview in the editor, proportional resizing. | ✓ | ✓ |
| Advanced Gutenberg block — vertical orientation, responsive, full appearance, interactions. | — | ✓ |
| Essential Elementor widget — free settings and simple preview in the builder. | ✓ | ✓ |
| Advanced Elementor widget — full Style tab (handle, labels, caption, container, wrapper) and live WYSIWYG preview. | — | ✓ |
| Shortcode + visual generator — codeless visual generator, saved list (rename, edit, copy, delete) and re-import for editing. | — | ✓ |
| WooCommerce gallery — multiple placements — Before / After gallery on product pages: metabox, full Product Data tab, multiples display slots. | — | ✓ |
| Extra CSS class — code customization, without touching the plugin. | — | ✓ |
One Pro license = Multiple Pro settings + advanced Gutenberg + Elementor Style + WooCommerce.
Pro license, updates & support
The free version is complete with no time limit; the Pro license unlocks the rest. One license covers a site quota (1, 3 or 5 sites depending on the plan chosen on the pricing page): shortcodes, visual generator, WooCommerce gallery, advanced appearance, vertical orientation, per-screen responsive and interactions. Without an active license, these features stay invisible and your free content keeps working normally.
Activate your Pro license
Order on the pricing page
Choose the plan matching your site count: you receive the license key by email plus access to your account.
Open the PixVisualize menu
In the WordPress admin, open the PixVisualize menu then the Account (or Pricing) page: license and subscription are managed there.
Paste the key and validate
Paste the key received by email into the license field and validate: WordPress confirms activation within seconds.
Verify the unlock
Pro settings appear (handle, separator, advanced labels, interactions, responsive), the Shortcode Generator tab too, and the Shortcodes and WooCommerce switches become functional.
Migrate from the free version
Back up the site
As before any extension operation: full backup (files + database).
Disable PixVisualize Free
Both plugins share the same block name: never activate them at the same time. Disable then delete the free version.
Activate PixVisualize Pro
The block name is preserved: all your existing comparisons are recognized immediately, with settings intact. Then activate your license (above).
Stress-free updates
With an active license, updates arrive in one click from Plugins → Installed Plugins, like any WordPress plugin. Before each update: full backup of the site. After: empty the cache, regenerate CSS (Elementor → Tools → Regenerate Files & CSS) and reload with Ctrl+F5.
On regression: restore the backup, report the issue to support specifying versions (WordPress, PHP, Elementor, PixVisualize) and the concerned page URL.
Prerequisites & compatibility
| Component | Required | Details |
|---|---|---|
| WordPress | 6.8 or higher | Kept up to date preferably. |
| PHP | 7.4 or higher | 8.x recommended for performance. |
FAQ & troubleshooting
Frequently asked questions
Does the comparison slider work on mobile?
Yes: responsive, touch swipe, dedicated tablet and mobile positions and ratios.
Are my settings affected by the settings page?
No: each block keeps its settings in the content. The PixVisualize page only controls global activation; re-enabling a toggle brings everything back.
What happens if I disable a toggle?
The feature stops rendering (block, widget, shortcode or gallery), but existing content stays intact.
Can I use the shortcode without Elementor?
Yes: block and shortcode work standalone, Elementor is only needed for the widget.
The widget or gallery doesn't display?
Check: active Elementor / WooCommerce, toggle checked in the PixVisualize page, page or product properly saved.
Migrating from PixVisualize Free? PRO
The block keeps the same name: your content is preserved. Never activate Free and Pro at the same time (same block name): disable Free before activating Pro.
Why go Pro? PRO
For the 39 settings that sell: per-device responsive, custom style, interactions and WooCommerce.
Container shadow cut off flush with the widget. What to do?
Three checks, in order: 1) Update — recopy the whole plugin (folders build/ and assets/ included), regenerate CSS (Elementor → Tools → Regenerate Files & CSS), purge cache and reload the editor with Ctrl+F5. 2) Cropping parent — the parent container or column is set to Overflow: Hidden (typical with a background or rounding): switch it to Visible, the Elementor default. 3) Parent intentionally Hidden — give it enough inner margin (padding) to house the shadow blur and spread.
In the Elementor editor, the 21/9 format looks squashed. Is that normal?
No: the preview must be identical to the published page — 21/9 fills the width, 9/21 fills the height, always in contain with no distortion. If the preview differs from public, your plugin is out of date: recopy it entirely, regenerate Elementor CSS and reload the editor (Ctrl+F5).
The "Full width" option changes nothing. Why?
Because the slider is already capped by its parent: with a fixed-height parent, contain mode already limits the area and full width adds nothing. It is only useful with an auto-height parent, to fill the content width.
My shortcode stays displayed as plain text, no slider. Why?
The shortcode
is only registered in the Pro version with an active license and the Shortcodes switch checked: without a license, WordPress doesn’t recognize it and displays it as-is (standard behavior, no error). Check the license, the switch, then reload the page. Note that the shortcode works without Elementor.
How do I activate my Pro license?
Order on the pricing page, then paste the key received by email into the PixVisualize → Account menu (or Pricing) and validate: Pro features unlock immediately. Full procedure: Pro license, updates & support tab.
Which WordPress and PHP versions are required?
WordPress 6.8 or higher and PHP 7.4 or higher (8.x recommended). Recent Elementor and WooCommerce are only required for the widget and product gallery.
Is the comparison slider keyboard-usable?
Yes: reach the slider with Tab, move it with arrow keys (2%, 10% with Shift) and jump to extremes with Home / End. Touch swipe works on mobile and tablet.
Shadow cut off flush with the widget?
If the shadow stays glued to the edges instead of overflowing freely: 1) make sure the plugin is up to date (recopy the whole folder, regenerate CSS in Elementor → Tools, Ctrl+F5); 2) switch the parent container to Overflow: Visible — a “Hidden” parent, common with a background or rounding, clips any nested shadow, as in native CSS; 3) if the parent must stay “Hidden”, add enough inner margin: like in native CSS, a shadow is pure paint with no reserved space.